Construction project planning: A step-by-step guide

By
Marketing Team
@Onetrace
Construction project planning is the process of mapping out how work will be delivered, covering the tasks involved, the order they happen in, the people responsible for each one, and the resources needed to get it done.
The importance of getting planning right comes through in research time and again.
Inadequate planning has been tied to delays (the leading cause in 31.4% of cases), cost overruns, and—in the worst-case scenarios—complete project failure.
With so much at stake, construction project planning needs to be thorough from the outset.
That’s why this guide breaks the process into 14 smaller, practical steps that can improve how you plan projects.
Key takeaways
Define what the project can’t compromise on
Separate must-haves from preferences so the team can make better trade-offs when time, cost, and quality compete.Build the programme around construction reality
Investigate site conditions, involve delivery teams, map dependencies, and base durations on actual quantities and productivity rather than desired completion dates.Plan procurement and information alongside construction
Account for approvals, design releases, manufacturing, deliveries, and other prerequisites so site activities are genuinely ready to start.Keep risks, logistics, cash flow, and short-term planning connected
Treat these factors as part of production planning, then use lookaheads and regular reviews to identify problems before they affect the programme.Use connected tools to keep planning under control
Onetrace brings scheduling, productivity data, timesheets, material tracking, variations, documents, and reporting together so teams can plan work and respond to changes from one place.
14 practical steps for successful construction project planning
These 14 steps break the process into smaller areas to work through, helping you build a plan that reflects the realities of the project rather than a checklist that only looks good on paper.
Step 1: Define the project’s must-haves
From the outset of the project, the construction team needs to agree the project’s non-negotiable outcomes. These might include:
A fixed handover date
A maximum budget
A target energy rating
A required floor area
The need to keep part of an occupied building operational during the works
Preferences belong in a separate category, so there’s room to make sensible trade-offs when priorities clash.
For example, a retail fit-out may have a non-negotiable opening date because the tenant has already scheduled its launch, while the choice of flooring or internal finishes can still change without affecting that date. In this case, protecting the opening date should carry more weight than preserving a particular finish.
This distinction gives the team a clear basis for weighing up decisions when time, cost, and quality pull in different directions.
Step 2: Investigate the site thoroughly
Site investigations should establish the conditions that could affect how the project is designed, priced, or built. The most common site conditions and constraints that can change the cost, programme, or construction method include:
Ground conditions and soil stability
Underground utilities and live services
Asbestos in existing buildings
Existing structural condition and alterations
Drainage and flood risk
Ground or building contamination
Site access and delivery restrictions
Neighbouring activity and nearby infrastructure
The Health and Safety Executive (HSE) recommends using available site information at tender stage and then checking the site’s history and surroundings for issues like unusual ground conditions, public rights of way, and nearby roads or railways.
Pro tip:
To prevent unresolved site issues from turning into costly surprises, you should keep an unknowns register. It should record:
Which questions are still unanswered
How they will be investigated
Who is responsible for resolving them
When they need to be confirmed
What happens to the cost or programme if the issues aren’t resolved in time
Step 3: Map out approvals and statutory duties
In UK construction, regulatory compliance can affect who needs to be appointed, what information must be submitted, when work can start, and which inspections are required along the way. Compliance is a planning issue as well as a legal one.
So, you should identify every approval, notice, appointment, and inspection that could affect the start or sequence of the work early on.
The table below covers some of the key requirements to consider:
Requirement | What to check |
Construction (Design and Management) Regulations 2015 (CDM 2015) | • Whether the project involves more than one contractor • Whether pre-construction information has been shared • Whether the construction phase plan and health and safety arrangements are in place before work starts |
• What the approval route and Building Control body should be • Which inspections and notices are required • Which requirements are needed for completion certification | |
Building Safety Act 2022 and Building Safety Regulator (BSR) requirements | • Whether the building meets the higher-risk criteria in England • Whether the BSR Building Control approval can be obtained before relevant work starts |
Town and Country Planning Act 1990 and planning permission | • Whether planning permission or permitted development rights apply • Which conditions affect the programme or construction method • Whether there’s enough time for application, consultation, and decision-making |
• Which works involve party walls, party structures, or lines of junction • Which excavations could affect adjoining buildings • Whether there’s time for required notices, agreements, or awards |
Missing one of these requirements can hold up the work even when the design and resources are ready.
Under CDM 2015, projects involving more than one contractor require the client to appoint a principal designer and principal contractor, with each role carrying specific planning and coordination duties.
Step 4: Develop the construction strategy before the programme
The design alone doesn’t determine the delivery of the work. The team also needs to settle the construction approach, which is defined by factors like:
Site access and delivery routes
Work zones and material storage
Temporary works and services
Plant, crane, and hoist requirements
Excavation and temporary weather protection
Trade and package interfaces
Step 5: Build the programme around realistic production rates
Construction durations should be derived from the work involved and the resources available, not reverse-engineered from a desired completion date. Estimates should account for:
Quantities to be installed
Crew size and available labour
Expected productivity rates
Site conditions and constraints
Material availability
Comparable project performance
For example, 600 square metres of brickwork completed by a crew averaging 30 square metres per day would require roughly 20 working days, before allowing for site-specific constraints or planned contingency.
Step 6: Get the people doing the work to challenge the programme
A programme becomes more reliable when the people responsible for delivery test its assumptions before work starts. Subcontractors and site supervisors can flag:
Unachievable durations or sequences
Missing prerequisites or design information
Material lead times and ordering deadlines
Required labour levels and equipment
Access constraints and trade clashes
Site conditions that could delay the work
Their input can also identify safety issues created by the proposed sequence, such as two trades needing the same access route or specialist work requiring the site to be cleared.
Step 7: Identify dependencies before assigning dates
Dependencies define the conditions that must be met before an activity can start or finish.
Some are physical, such as concrete needing to cure before temporary supports are removed; others depend on resources, information, approvals, or another trade finishing its work.
The relationship can also be more complex than one task following another.
For example, pipe laying and manhole installation can proceed in parallel once excavation is complete, but backfilling can’t begin until both the pipework has been joined and sealed and the manholes have been installed.
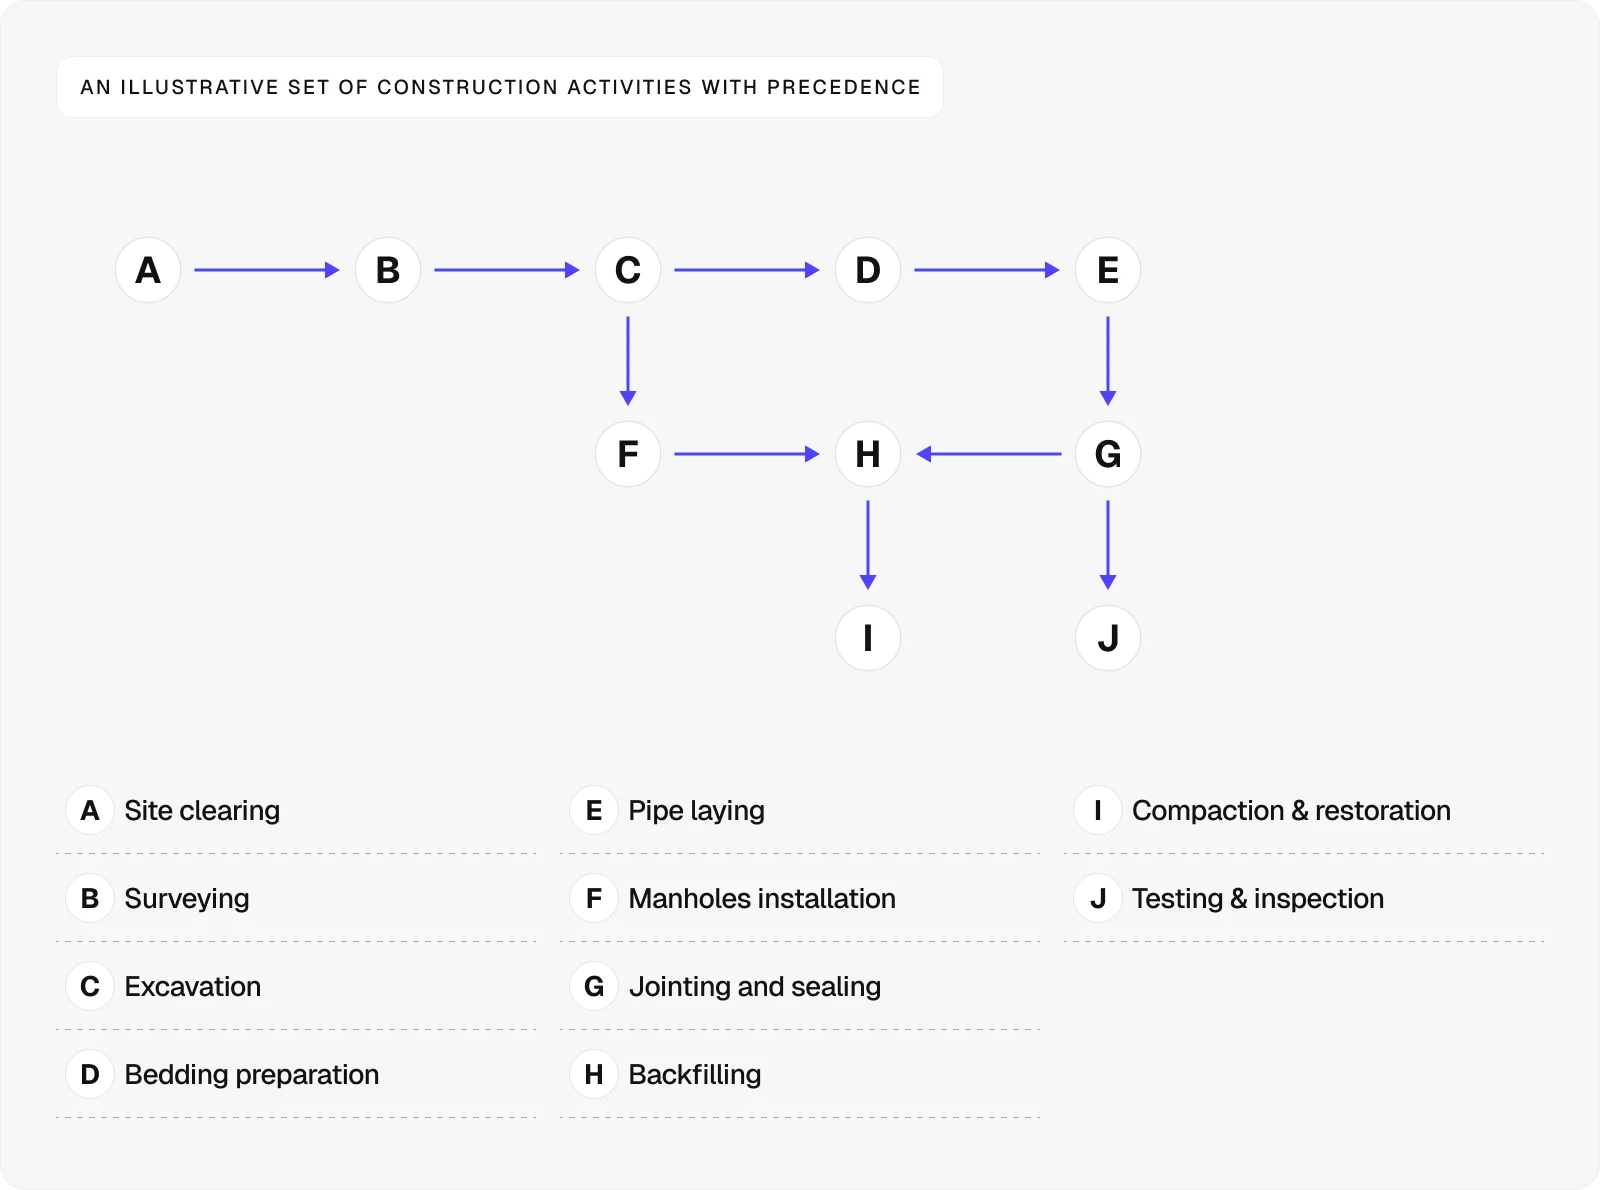
Mapping these relationships first gives the programme workable logic instead of just placing activities on a calendar.
Step 8: Build procurement into the programme from day one
Procurement should be planned alongside construction, because a material or specialist package that arrives late can stop an activity even when the site is otherwise ready.
So, for any item that could affect a critical activity, you should work backwards from the date it’s needed on site. For example, if a piece of equipment is needed for installation in September, the programme should show:
When its design and specification must be complete
When it needs approval
When the supplier must be appointed
How long manufacturing will take
When delivery must happen
This approach captures the full procurement period by accounting for every step, instead of treating supplier lead time as the only deadline.
During this step, pay particular attention to long-lead or project-specific items like:
Mechanical and electrical equipment
Bespoke or custom-manufactured components
Structural steel and precast elements
Imported materials
Client-selected finishes
Products requiring technical submittals or approval
Step 9: Build an information-release schedule
Construction work can’t start on time if the drawings, specifications, approvals, or decisions needed for that work are still outstanding. That’s why you should treat information releases as programme activities, with a defined owner and deadline.
For each major activity, identify which of the following information releases must be completed before work can start:
Issuing construction drawings
Completing structural details
Coordinating MEP layouts
Approving specifications
Confirming product selections
Reviewing technical submittals
Approving temporary works designs
Providing building control information
Answering RFIs
Confirming client decisions
For example, if ceiling installation depends on coordinated MEP drawings, approved light fittings, and resolved RFIs, each of those items needs to be completed before the installation crew arrives. Otherwise, the programme may show the work as ready when the information required to carry it out isn’t.
Pro tip:
Use an information matrix to assign responsibility for producing, reviewing, and approving each information item, set the deadline for each action, and link it to the programme activity that depends on it.
Step 10: Build the risk register around decisions, not generic hazards
A risk register becomes much more useful when each entry leads to a planning decision.
So, for every risk, define the following details:
The trigger that signals it’s emerging
The programme or cost impact it could create
The action needed to reduce that impact
The person responsible for acting on it
This approach allows teams to adjust the programme before a risk turns into a delay.
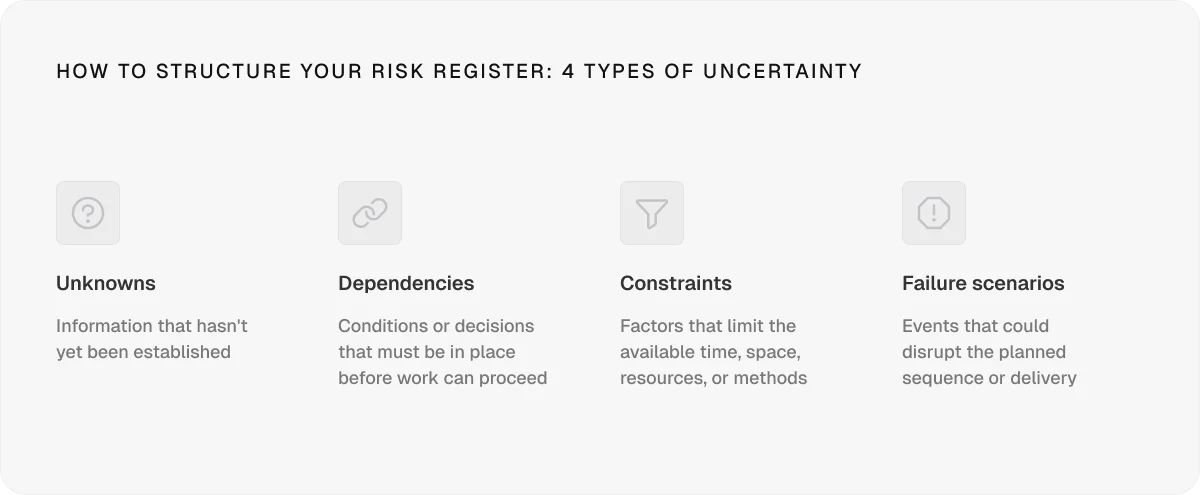
When compiling the risk register, be as specific as possible, since entries such as ‘bad weather’ or ‘labour shortage’ are too broad to guide decisions.
Step 11: Plan site logistics as carefully as the work itself
A programme can schedule a steel delivery for Monday, but that date means little if the site can’t safely receive, unload, store, or move the material. For this reason, you should treat logistics as a production constraint and test each major delivery against the actual site setup.
During this step, consider the following factors:
Delivery windows: Confirm when deliveries can arrive without conflicting with site operations or local restrictions.
Vehicle access: Check vehicle dimensions, turning space, road restrictions, and any required permits.
Offloading: Confirm that the required crane, plant, lifting area, and operators will be available.
Storage: Allocate secure, accessible space that protects materials without obstructing work areas.
Material movement: Check that hoists, cranes, routes, and handling equipment can move materials from the arrival point to where they are needed.
Site access: Separate pedestrian and vehicle routes while maintaining emergency access.
Waste removal: Plan collection points, removal routes, and disposal arrangements alongside deliveries.
Neighbour constraints: Account for working hours, noise limits, shared access, and neighbouring properties.
On constrained urban sites, these factors can determine when a trade can start work, so they belong in the programme rather than in a separate logistics plan.
Step 12: Connect the programme to cash flow
A programme can look achievable on paper and still fail financially. If the schedule requires a major workforce increase, large material deposits, and additional plant at the same time, the project needs enough cash and resources to support that peak.
That’s why the programme should also be mapped against expected cash inflows and outflows, so major spending commitments are identified before they create a funding gap.
Step 13: Turn the master programme into a short-term production plan
The master programme sets the direction, but the site team needs a much shorter view of what must happen next. So, you should break the overall programme into phase plans, lookaheads, and weekly commitments and use those plans to identify constraints before they affect production.
A useful sequence is:
Master programme
Phase programme
Six-week lookahead
Weekly plan
Daily coordination
The key is to confirm that upcoming work is genuinely ready, not only scheduled. If design, materials, access, labour, approvals, or preceding work are still outstanding, the activity needs attention before it reaches the weekly plan.
Pro tip:
A construction scheduling tool can make the short-term plan much easier to manage, especially when teams move between multiple projects.
For example, Onetrace’s Planner gives you different views depending on which information you need:
Project view: See every operative assigned to a project and how the team is scheduled.
Operative view: Check one person’s upcoming workload or see when a team is available.
Custom views: Filter by site, crew, or client to focus on the work relevant to you.
Thanks to these capabilities, you can switch between the project-level picture and the specific people or teams you need to coordinate without rebuilding the schedule.
Step 14: Make the programme a living control tool
One of the most common misconceptions is that construction project planning stops once the actual work begins. However, planning must continue throughout execution to track progress, respond to changes, and keep the project on course.
A simple programme review cycle should give the team a consistent way to monitor progress throughout all the phases of construction project management:
Daily: Review critical activities and current blockers.
Weekly: Compare planned and actual progress.
Lookahead: Review upcoming constraints.
Monthly: Update the overall programme and completion forecast.
Whenever activity overruns happen, record the cause, whether that’s late information, poor productivity, material delays, rework, access issues, weather, preceding-trade delays, or unrealistic estimates.
These records should help you improve future durations, sequencing, and risk allowances.
Streamline construction project planning with Onetrace
Onetrace brings all the relevant information behind your programme into one system, giving you better visibility when planning work, tracking progress, and adjusting to change.
Besides the Planner, Onetrace offers the following features that support the planning process:
Material tracking: Record quantities, costs, and usage to spot procurement gaps and keep material planning aligned with the budget.
Productivity data: Review performance by operative, team, or project to use your own historical results when setting realistic production rates.
Timesheets: Track hours by operative, team, or project to compare planned labour with real performance and improve future duration estimates.
Variation tracking: Record changes to the original scope as they arise so you can account for their impact instead of letting them disrupt the programme unnoticed.
Approvals: Set up review stages and track outstanding sign-offs so required checks happen before dependent work moves forward.
Docs & Files: Keep RAMS, drawings, contracts, certificates, data sheets, and job instructions in one central location so teams can access the information they need when planning and delivering work.
Reporting: Turn site data into PDF or Excel reports to compare progress, costs, and completed work with the plan and support faster decisions.
Drawings and site data: Organise drawings by blocks, levels, and zones to connect planned work with specific areas and keep site information structured.
Schedule a personalised walkthrough with the Onetrace team to see how these features can fit your workflows and give your team better visibility from the office to the site.
FAQ
What is a project plan and schedule?
A project plan defines what the project must deliver and how it will be managed. A schedule sets out when each activity will happen and in what sequence.
What are the components of a good project plan?
The components of a good project plan include scope, schedule, resources, costs, procurement, risks, quality management, and communication.
What are the 7 steps of project planning?
The seven main steps of project planning are:
Defining project goals
Identifying stakeholders
Establishing the scope
Creating the work breakdown structure (WBS)
Estimating resources and timelines
Marketing Team
@Onetrace
The Onetrace marketing team is passionate about sharing insights, ideas, and innovations that help construction businesses stay connected, compliant, and efficient. Combining industry expertise with a love for clear communication, we aim to deliver content that empowers professionals to work smarter and safer.